Task Types
Task Types is the area within which it is possible to report tasks. For each task type, you can set who has the authority to report the issue, who the default responsible person should be, or what context the tasks will cover.
- Name
- Project ID
- Enabled for Task Contexts
- Desktop Rights
- Web Access
- Task Custom Fields
- Automatic Due Date
- Photo Required
- Create on Planogram Approve
- Create on Report Issue in Planogram
- Assign to Creator
- Default Assignee
- Allowed User Groups [Assign by]
- Restricted Automatic Assignees
- Assign by Stores
- Assign by Categories
- Start Watching Automatically on Edit
- Watch by Creator
- Default Watchers
- Allowed User Groups [Watch by]
- Restricted Automatic Watchers
- Watch by Stores
- Watch by Categories
What are some examples of task types?
- Wrong planogram implementation - a category manager can create a task for a store that has implemented a planogram incorrectly and request that it be corrected.
- Missing product - a store can report that it does not have a product in stock that is in the planogram.
- Broken fixture - a store can report a broken shelf and request a new one to be sent.
- Planogram inconsistencies - a store can report to the category manager that the planogram is incorrectly drawn and not up to date.
- Problems with shelf labels - a store is missing a shelf label or has the wrong shelf label.
- Planogram implementation problems - the store has problems implementing the planogram because in reality the products do not fit on the shelf. So they report this problem to the head office and the head office corrects the planogram. The HQ can also ask the store to remeasure the shelf using a task.
- Updating marketing materials - the category manager can create task to a group of stores or all stores to replace a poster with another one.
How to create a new task type?
- In Quant, under the Task Settings / Task Types section, click on the New button.
- Then set the properties in the properties panel on the right.
Task Types properties
Basic
Name
Fill in the name of the task type - the area that each of the tasks will cover.
Wrong planogram implementation
Project ID
A unique ID is created for each task. To quickly identify the tasks and know which task types they are, fill in the project ID here. Subsequently, the individual tasks that will be created under that task type will contain this text in the ID.
The ID for a bad planogram implementation is POG. The first task created will have the ID POG-1, the second POG-2.
Enabled for Task Contexts
Here you set where the task type can be reported.
A task with a bad planogram implementation should only be able to be based on the page with the specific planogram or on the page with the specific implementation photo, so that it is clear which planogram or photo it is.
The task can be reported in different places on Quant Desktop and Quant Web. Depending on which page we are on, we will be prompted with the task type that can be set up.
A task type can have multiple contexts enabled. For example, if a store reports a problem with broken fixture, it can report it when it is on both the planogram page whose fixture is broken and the page with the fixture.
For an explanation of each task context, see the more detailed Task Contexts manual.
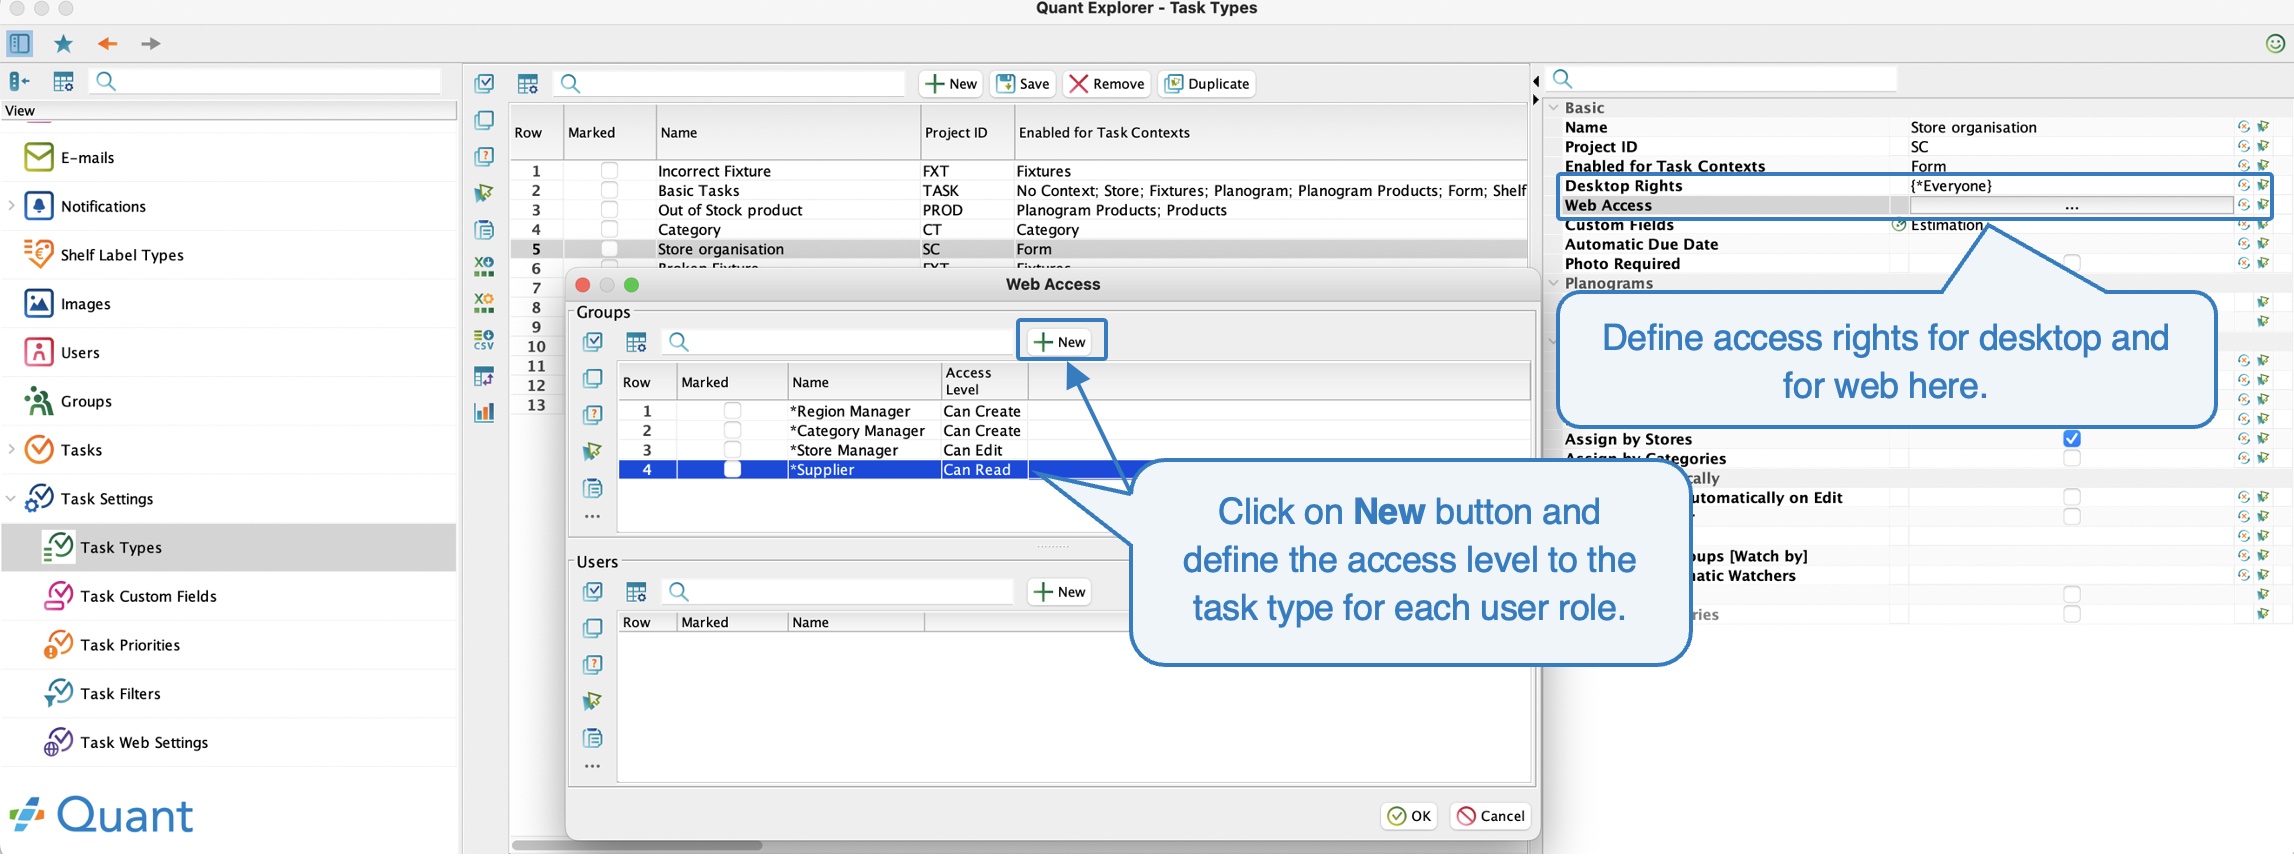
Desktop rights
This is where you define the desktop rights to a given task type for each user role.
Web access
Here you define the web access rights to a given task type for each user role.
 Desktop Rights and Web Access
Task Custom Fields
First of all task custom fields must be defined in the task custom fields section of Quant. These fields are then automatically assigned to all task types. You can then edit which custom fields should be displayed for a given task type in the Custom Fields.
Automatic Due Date
Here you can set an automatic due date for the task type, i.e. how long after the task is created the task should be resolved.
Photo Required
If you check this box, Quant will not allow you to create a task without an attached photo.
Create on Planogram Approve
If the check box is selected, it is possible to create a task automatically when the planogram is approved.
You can use this, for example, as a form of notification to the store that the planogram has been approved. Thus, every time a planogram is approved, a task can be created for the store. The store can easily see which planogram it is and then close the task.
In order for a task to be created on approval, the context must be set to Planogram.
Create on Report Issue in Planogram
This checkbox works on a similar principle to the previous settings. Here, a task is automatically created every time the user clicks on the Report Issue button on the planogram page.
The problem can only be reported on the Implemented Planogram page. For this button to appear, the Create on Report Issue in Planogram check box must be selected on at least one task type for the user role.
Assign Automatically
In this section, you can set who should automatically become the task assignee (responsible person) when a task of a given type is created. For example, if you know that the Marketing task type is to be handled by the Marketing department, you can set the task to be automatically assigned to the user who handles marketing issues. This eliminates the extra work associated with, for example, a store creating a task, assigning it to the wrong person, who has to delegate the task further.
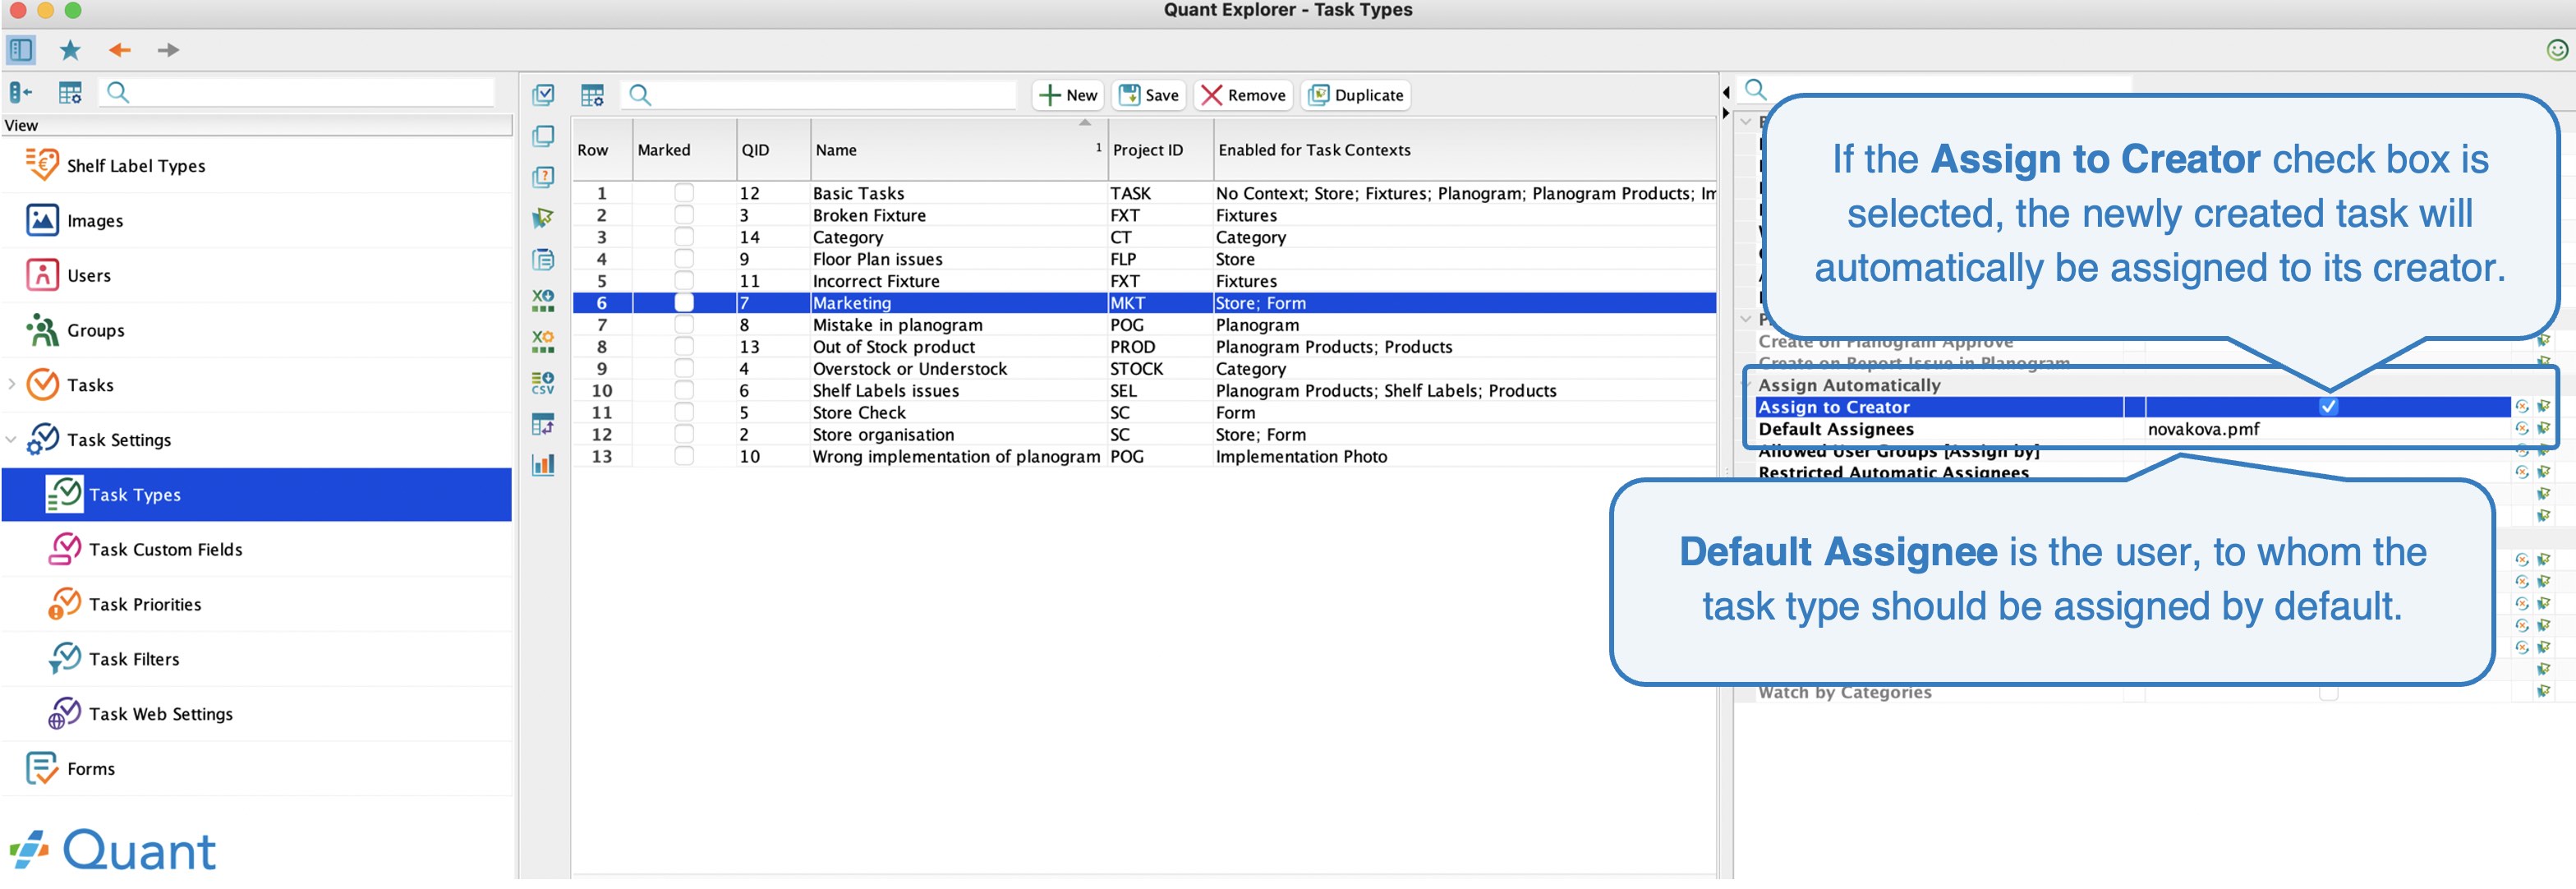
Assign to Creator
If you check this box, the task is always automatically assigned to its creator. The user can subsequently assign it to someone else.
Default Assignee
Here you can set to whom to assign the automatically created task, unless the user sets otherwise.
 Assign to Creator and Default Assignee
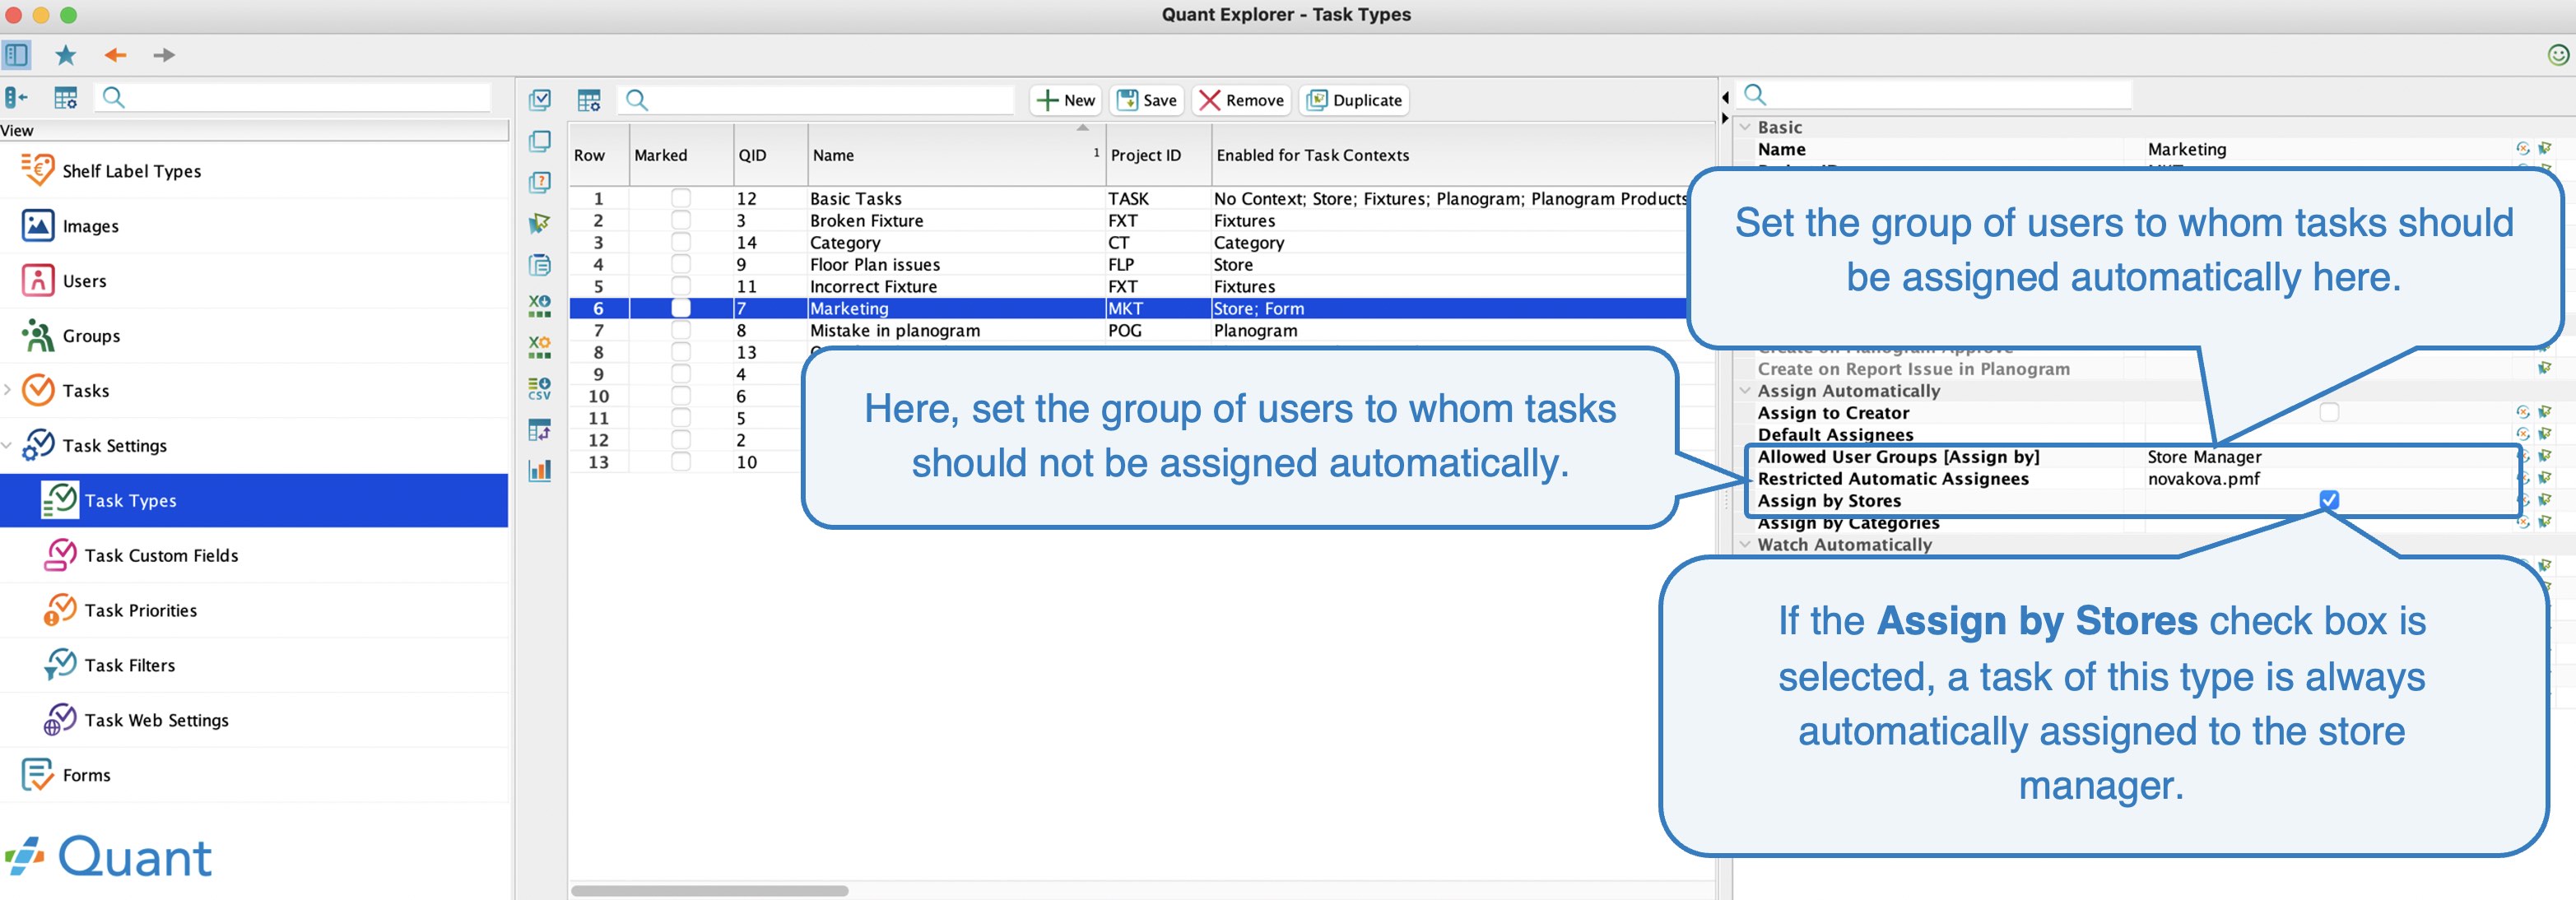
Allowed User Groups [Assign by]
If you want to use automatic assignment of tasks to a user group, you must select that group in this row.
Restricted Automatic Assignees
If you want to exclude certain users from the group of automatic assignees, you need to select them in this row.
Assign by Stores
If you want the task type to be automatically assigned to the store for which the task was created, select the Assign by Stores check box. However, you must also select a group that includes all store managers in the Allowed User Groups [Assign by] line.
We want to automatically assign the Marketing task type to the managers of a specific store each time. Thus, whenever a task with the Marketing task type is created, it will automatically be assigned to the manager of that store. This way, you can create a task for all stores in bulk and instruct them to, for example, display a new poster in the store.
 Assign by Stores
Assign by Categories
You can use this attribute in the case of the Category context. Different users can be in charge of different departments. In Quant, you can configure on a specific user which categories he/she manages.
If you want the task to be automatically assigned to the category manager in charge of the category, you must select the Assign by Categories check box. However, you must also select a group that includes all category managers in the Allowed User Groups [Assign by] line.
The manager of the category Pastry is the user vozenilkova.pmf. If we create a task for this category, it will be automatically assigned to this user.
Watch Automatically
In this section, you can set who will be automatically set to watch a given task type. The watcher will receive notifications automatically if they are set, so they will be kept informed of the progress of the solution.
Start Watching Automatically on Edit
A user who starts editing a task will automatically be assigned as a follower of that task.
Watch by Creator
A user who creates a task will automatically be assigned as a watcher of that task.
Default Watchers
You can also set a default watcher for a task type which is assigned as the watcher when each task of that type is created.
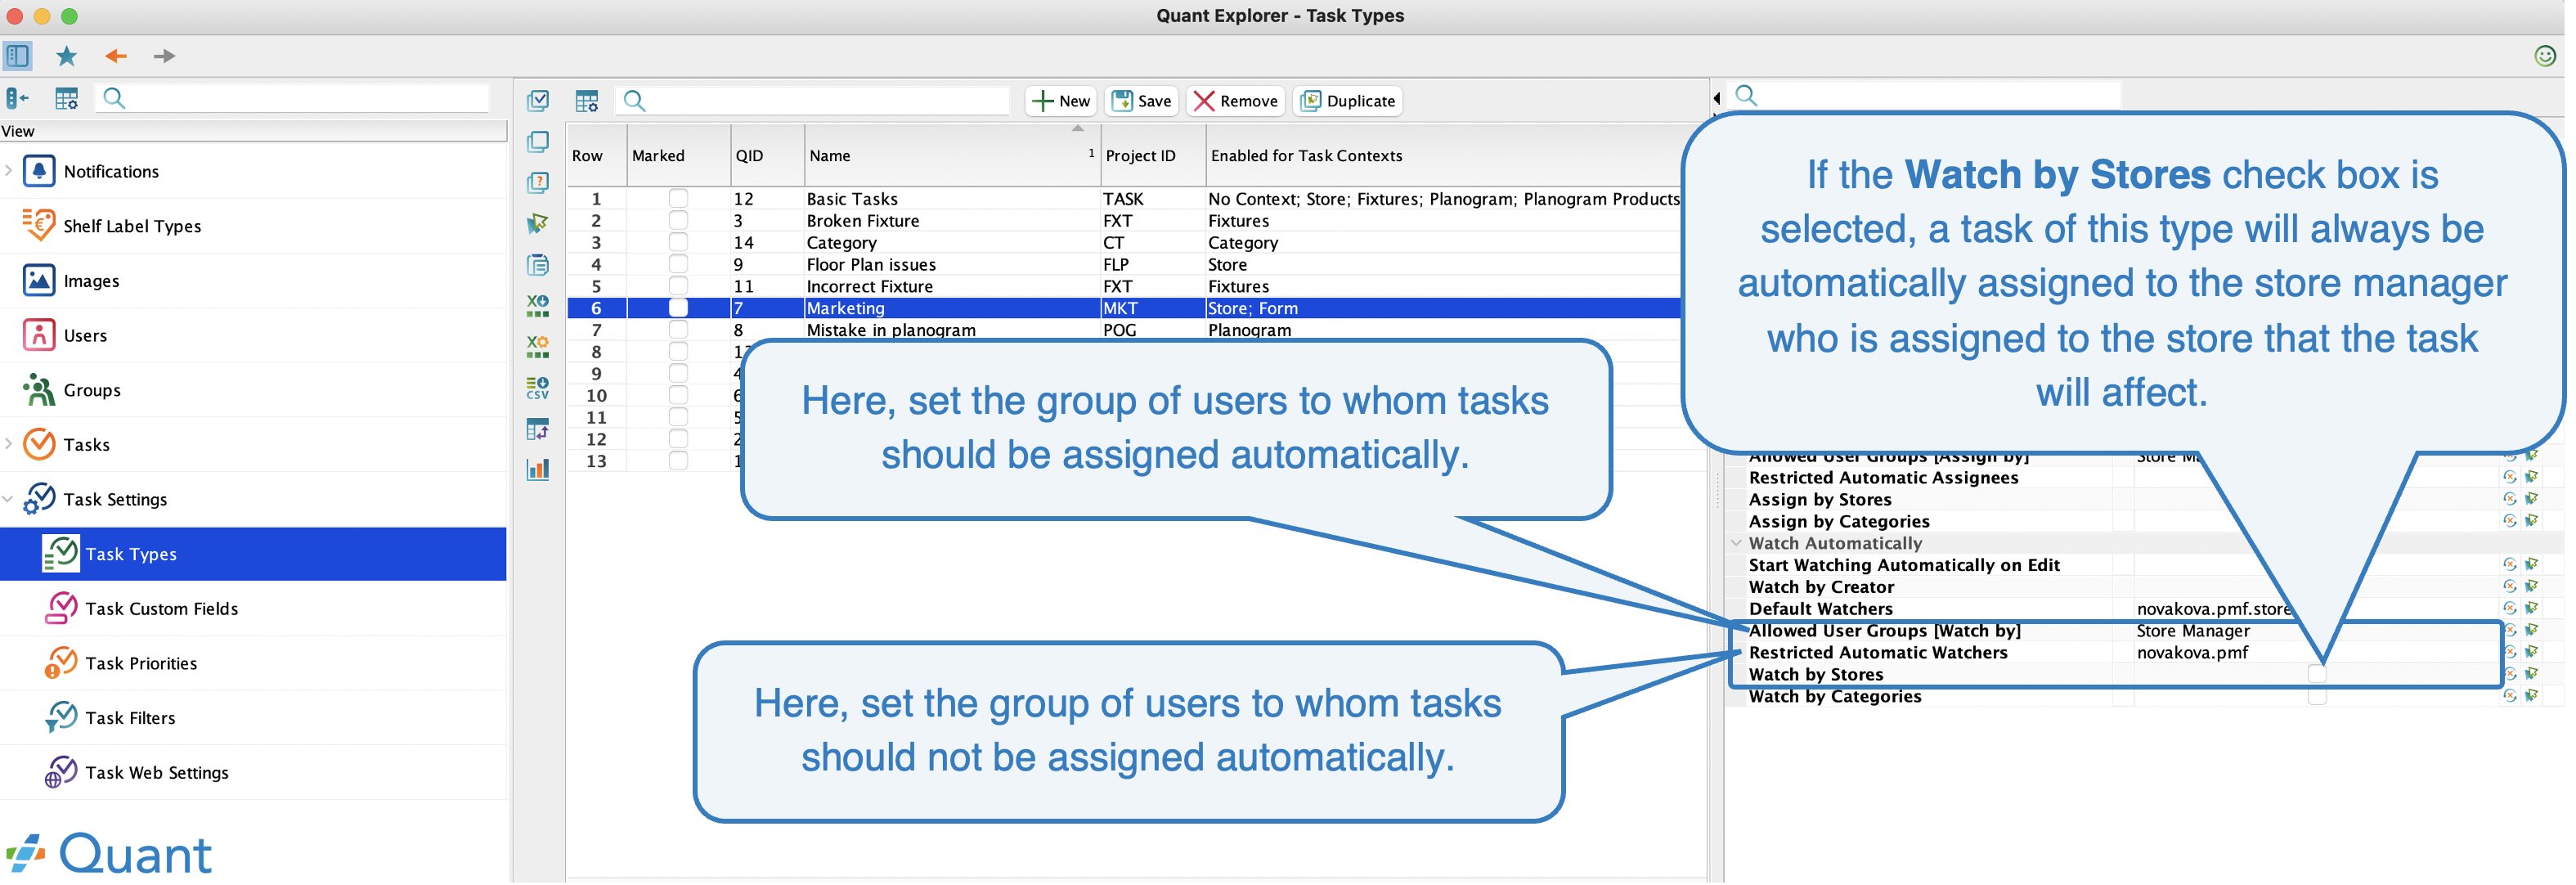
Allowed User Groups [Watch by]
Similar to the automatic setup of responsible persons, Quant can also automatically assign watchers. In this row, you need to set up a group of users who will be able to monitor the task type.
Restricted Automatic Watchers
In this row, select the users you want to exclude from the watchers group.
Watch by Stores
If you want a watcher to be automatically assigned to a task type by the store for which the task was created, select the Watch by Stores check box. However, you must also select the group that includes all region managers in the Allowed User Groups [Watch by] line.
 Watch by stores
Watch by Categories
You can use this attribute in the case of the Category context. Different users can be in charge of different departments. In Quant, you can configure on a specific user which categories he/she manages.
If we want the task to be automatically tracked by the category manager who is in charge of the category, we need to check the Watch by Categories checkbox. However, you must also check the group that includes all category managers in the Allowed User Groups [Watch by] line.
You can read more about email notifications for tasks in the Task Notification manual.
El tipo de tarea es el área dentro de la cual desea que se informe de las tareas. Para cada tipo de tarea, puede establecer quién tiene la autorización para informar sobre el asunto, quién debe ser la persona responsable por defecto o qué contexto abarcarán las tareas.
- Název
- ID projektu
- Povoleno pro kontext úkolů
- Desktopová práva
- Webový přístup
- Volitelné pole
- Automatické datum vyřešení
- Vyžadovat fotku
- Vytvořit při schválení planogramu
- Vytvořit při hlášení problému planogramu
- Přiřadit tvůrci
- Výchozí řešitelé
- Povolit pro skupiny uživatelů [Přiřadit podle]
- Nepřiřazovat automaticky (řešitelé)
- Přiřadit podle poboček
- Přiřadit podle kategorií
- Začít sledovat automaticky při úpravách
- Sledovat tvůrcem
- Výchozí sledující
- Povolit pro skupiny uživatelů [Sledovat podle]
- Nepřiřazovat automaticky (sledující)
- Sledovat podle poboček
- Sledovat podle kategorií
¿Cuáles son algunos ejemplos de los Tipos de tareas?
- Implementación incorrecta del planograma - el gestor de categorías puede crear una tarea para la tienda que ha implementado el planograma de forma incorrecta y solicitar una corrección.
- Producto en falta - una tienda puede informar de no tener en stock un producto que figura en el planograma.
- Accesorio roto - la tienda puede comunicar que se ha roto un estante y solicitar el envío de uno nuevo.
- Discrepancias en el plano de planta - una tienda puede informar al gestor de categorías de que el plano de planta está mal dibujado o que no está actualizado.
- Problemas con las etiquetas de precio - a la tienda le falta una etiqueta de precio o las que se imprimen son incorrectas.
- Problemas con la implementación del planograma - la tienda tiene problemas con la implementación del planograma porque los productos no caben en la estantería. Así que informan de este problema a la central y esta corrige el planograma. Al mismo tiempo, la central puede crear otra tarea para pedir a la sucursal que vuelva a medir la estantería.
- Actualización de materiales de marketing - el gestor de categorías puede encargar a un grupo de tiendas o a todas ellas que sustituyan un cartel por otro.
¿Cómo crear un nuevo tipo de tarea?
- En Quant, en la sección Configuración de tareas / Tipos de tareas, haga clic en el botón Nuevo.
- A continuación, ajuste las propiedades en el panel situado a la derecha.
Propiedades del tipo de tarea
Básicos
Nombre
Escriba el nombre del tipo de tarea: el ámbito que cubrirán las tareas pertenecientes.
Implementación incorrecta del planograma.
ID del proyecto
Se asigna un ID único para cada tarea creada. Para identificar rápidamente las tareas y saber de qué tipo son, introduzca aquí el ID del proyecto. A continuación, las tareas individuales que se creen bajo ese tipo de tarea llevarán este texto dentro de su ID.
El ID de la Implementación incorrecta del planograma es POG. La primera tarea creada tendrá el ID POG-1, la segunda POG-2.
Habilitado para contextos de tareas
Aquí se establece dónde se puede aplicar el tipo de tarea.
Una tarea creada para corregir la implementación incorrecta del planograma sólo debería poder crearse en la página con el planograma concreto o en la página con la foto de implementación de este planograma, para que quede claro de qué planograma o foto se trata.
La tarea se puede crear en varios lugares tanto de Quant Desktop como de Quant Web. Dependiendo de la página en la que nos encontremos, se nos indicará el tipo de tarea que podemos crear.
Un tipo de tarea puede tener varios contextos habilitados. Por ejemplo, si una tienda informa de que se ha roto un accesorio, puede informar de ello encontrándose tanto en la página del planograma cuyo equipo está roto como en la página con el equipo.
Para una explicación detallada de cada uno de los contextos de tareas, consulte el manual correspondiente.
Derechos de escritorio (Quant Desktop)
Aquí, para cada uno de los roles de usuario, se define el grado de acceso en Quant Desktop para un tipo de tarea determinado.
Acceso web
Aquí se define el nivel de acceso en Quant Web para un tipo de tarea determinado, para cada uno de los roles de usuario.
Campos personalizados
Los campos de tareas personalizados deben definirse primero en la sección Campos de tareas personalizados. Estos campos se asignan automáticamente a todos los tipos de tareas. Después, en la fila Campos opcionales, puede configurar qué campos personalizados deben mostrarse para un tipo de tarea determinado.
Automatické datum vyřešení
Zde můžete nastavit pro daný typ úkolu automatické datum vyřešení, tedy za jak dlouho od založení úkolu má být úkol vyřešen.
Vyžadovat fotku
Pokud zaškrtnete toto políčko, Quant nedovolí založit úkol bez přiloženého obrázku.
Vytvořit při schválení planogramu
Pokud je políčko zaškrtnuté, tak je možné vytvořit automaticky úkol v momentě, kdy dojde ke schválení planogramu.
Můžete to využít např. jako formu oznámení pro pobočku, že planogram byl schválen. Tedy při každém schválení planogramu se může vytvořit úkol pobočce. Pobočka si snadno zobrazí, o jaký planogram se jedná a následně úkol uzavře.
Aby mohl být vytvořen úkol při schválení, musí být kontext nastaven na Planogram.
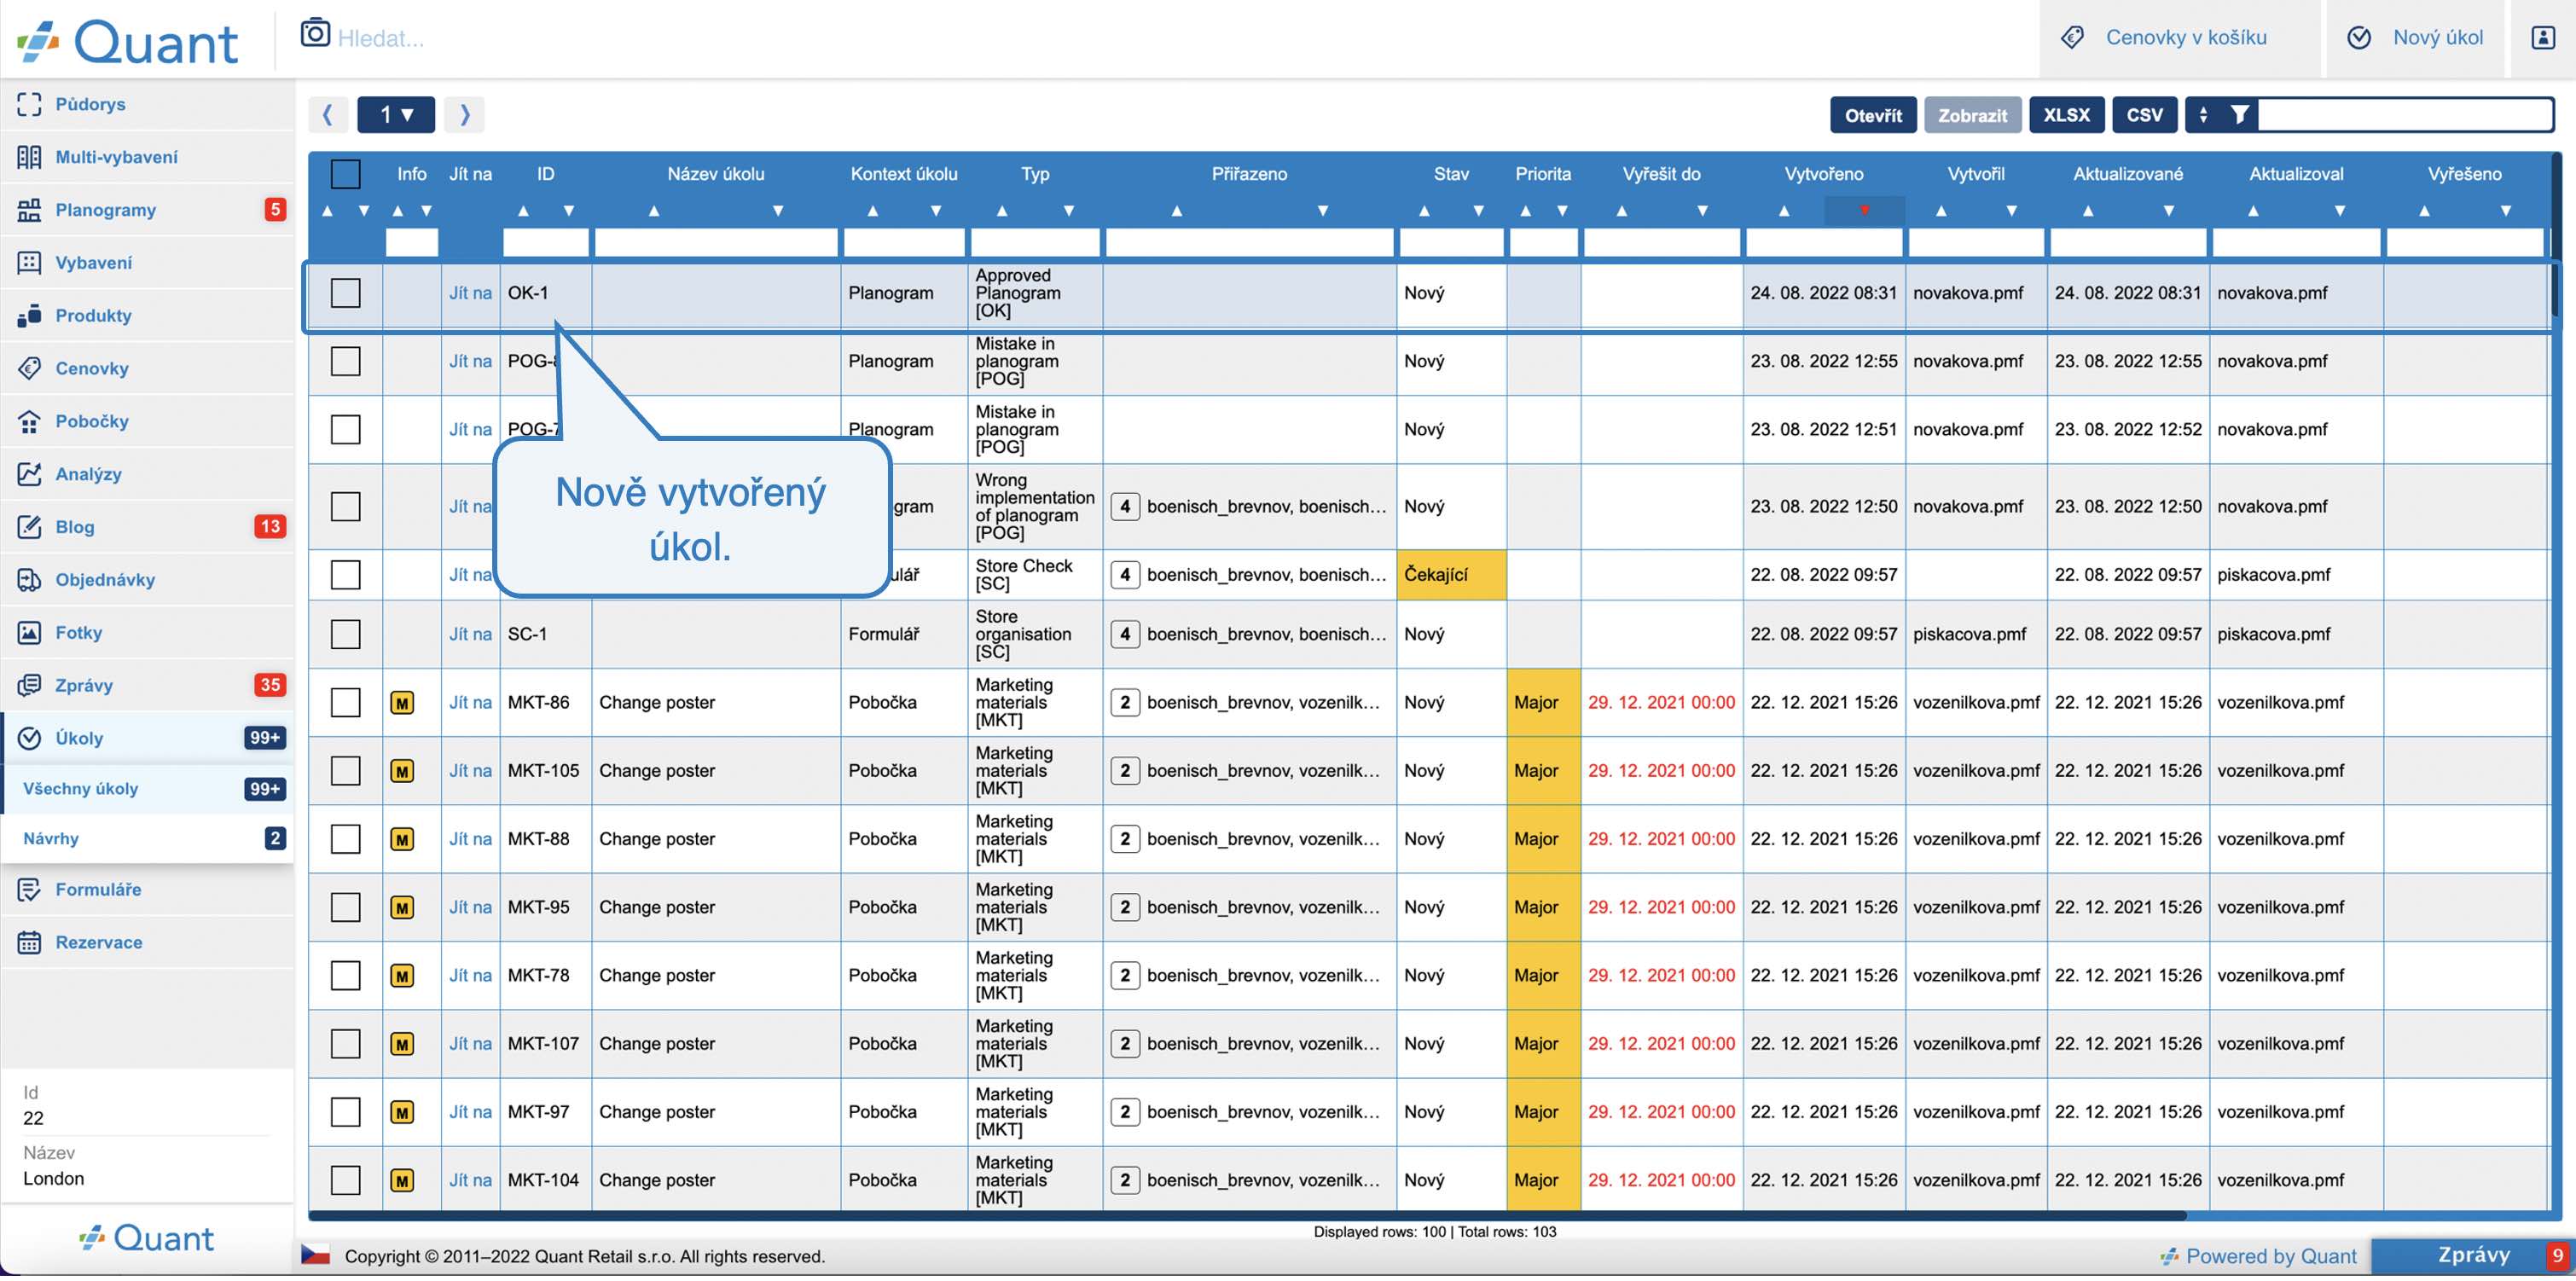 Nový úkol
Vytvořit při hlášení problému planogramu
Vytvořit při hlášení problému planogramu
Na podobném principu jako předchozí nastavení funguje i toto zaškrtávací políčko. Zde se vytvoří automaticky úkol pokaždé, když uživatel klikne na tlačítko Nahlásit problém na stránce s planogramem.
Problém lze nahlásit pouze na stránce s Implementovaným planogramem. Aby se toto tlačítko zobrazilo, tak musí být na alespoň jednom typu úkolu pro danou uživatelskou roli zaškrtnuté políčko Vytvořit při hlášení problému planogramu.
Přiřadit automaticky
V této sekci můžete nastavit, kdo se má automaticky při vytvoření úkolu daného typu stát jeho řešitelem (zodpovědnou osobou). Pokud např. víte, že typ úkolu Marketing má řešit marketingové oddělení, tak můžete na daném úkolu nastavit, aby se automaticky přiřazoval na uživatele, který řeší marketingové záležitosti. Odpadne tím dodatečná práce spojená s tím, že např. pobočka vytvoří úkol, přiřadí ho špatné osobě, která musí úkol dále delegovat.
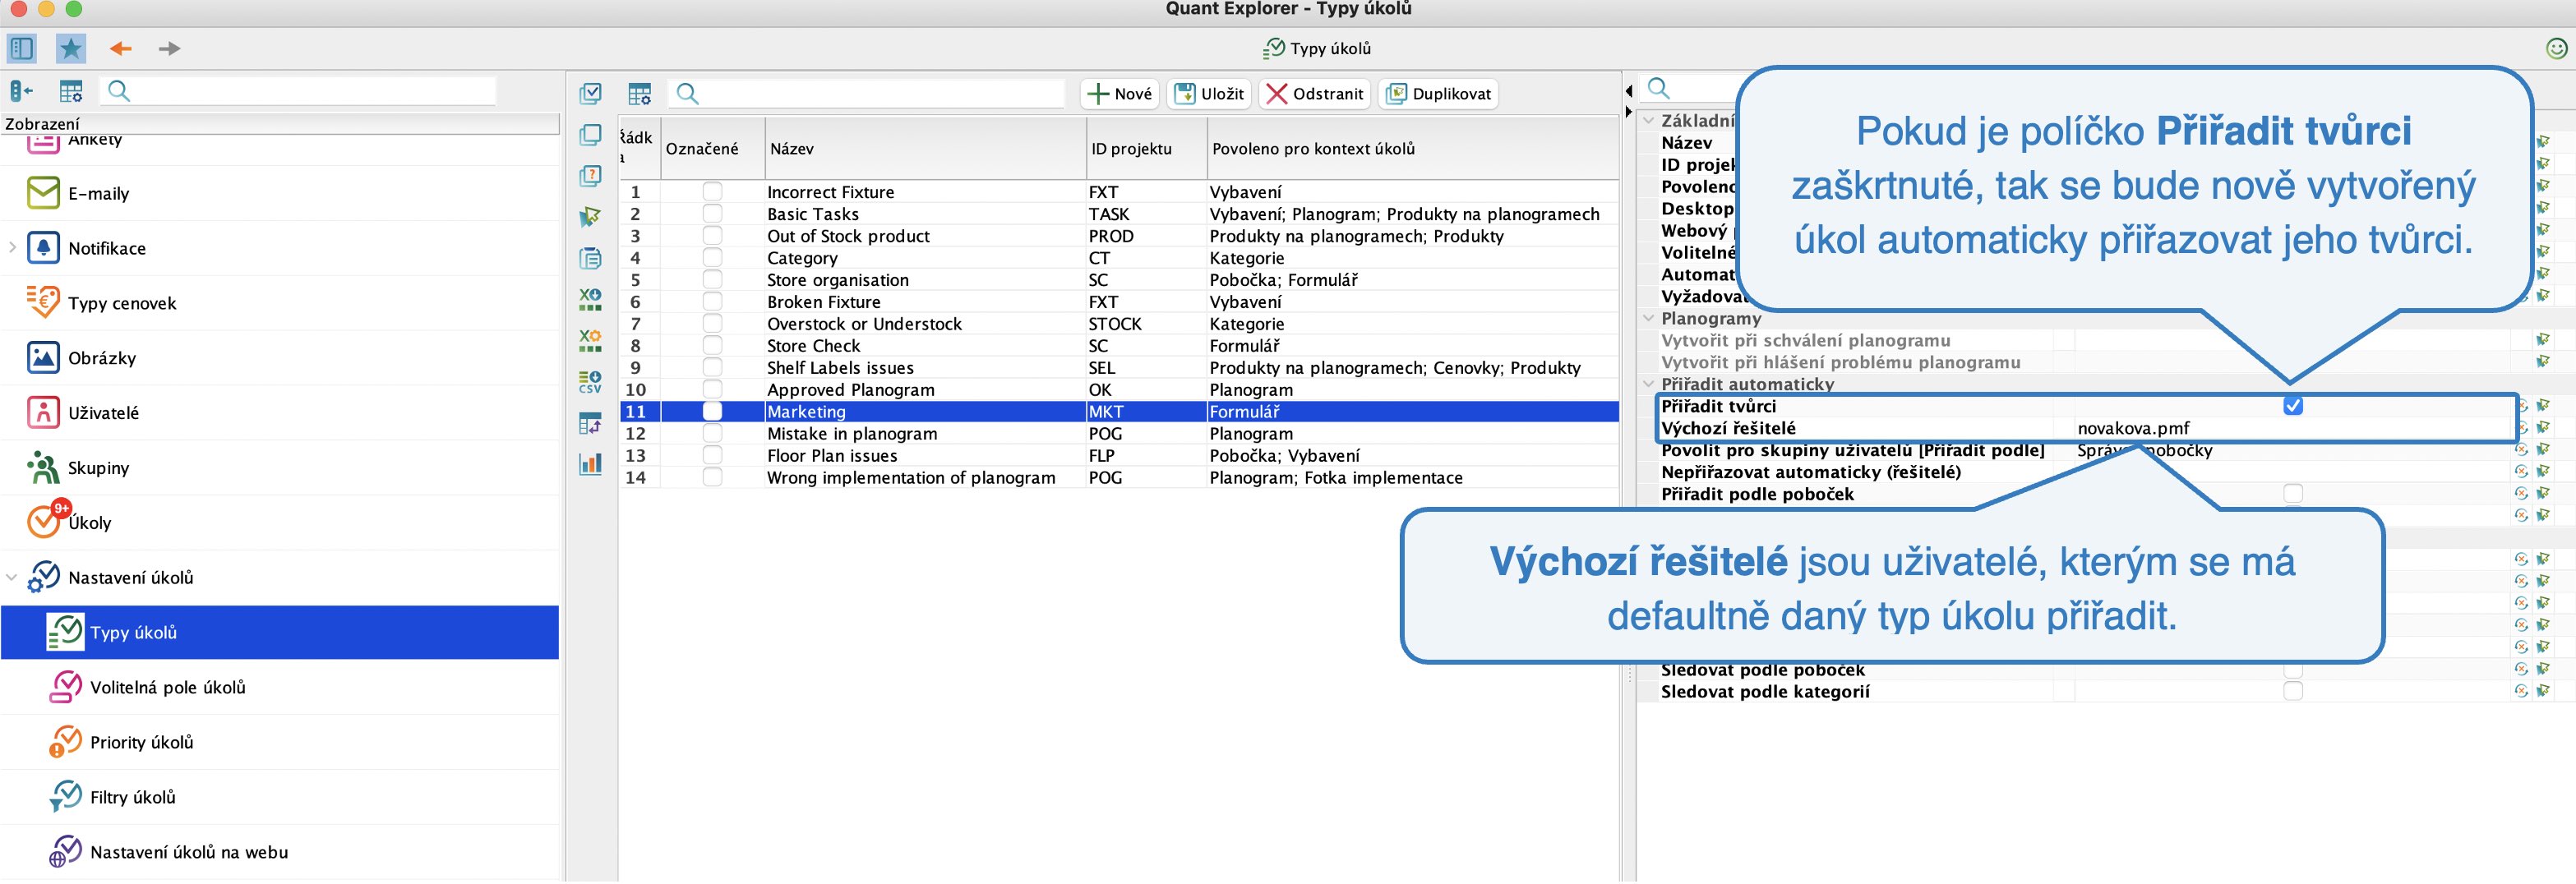
Přiřadit tvůrci
Pokud zaškrtnete toto políčko, tak se úkol vždy automaticky přiřadí jeho tvůrci. Uživatel ho může následně přiřadit někomu jinému.
Výchozí řešitelé
Zde můžete nastavit, komu se má přiřazovat automaticky vytvořený úkol, pokud uživatel nenastaví jinak.
 Přiřadit tvůrci a Výchozí řešitelé
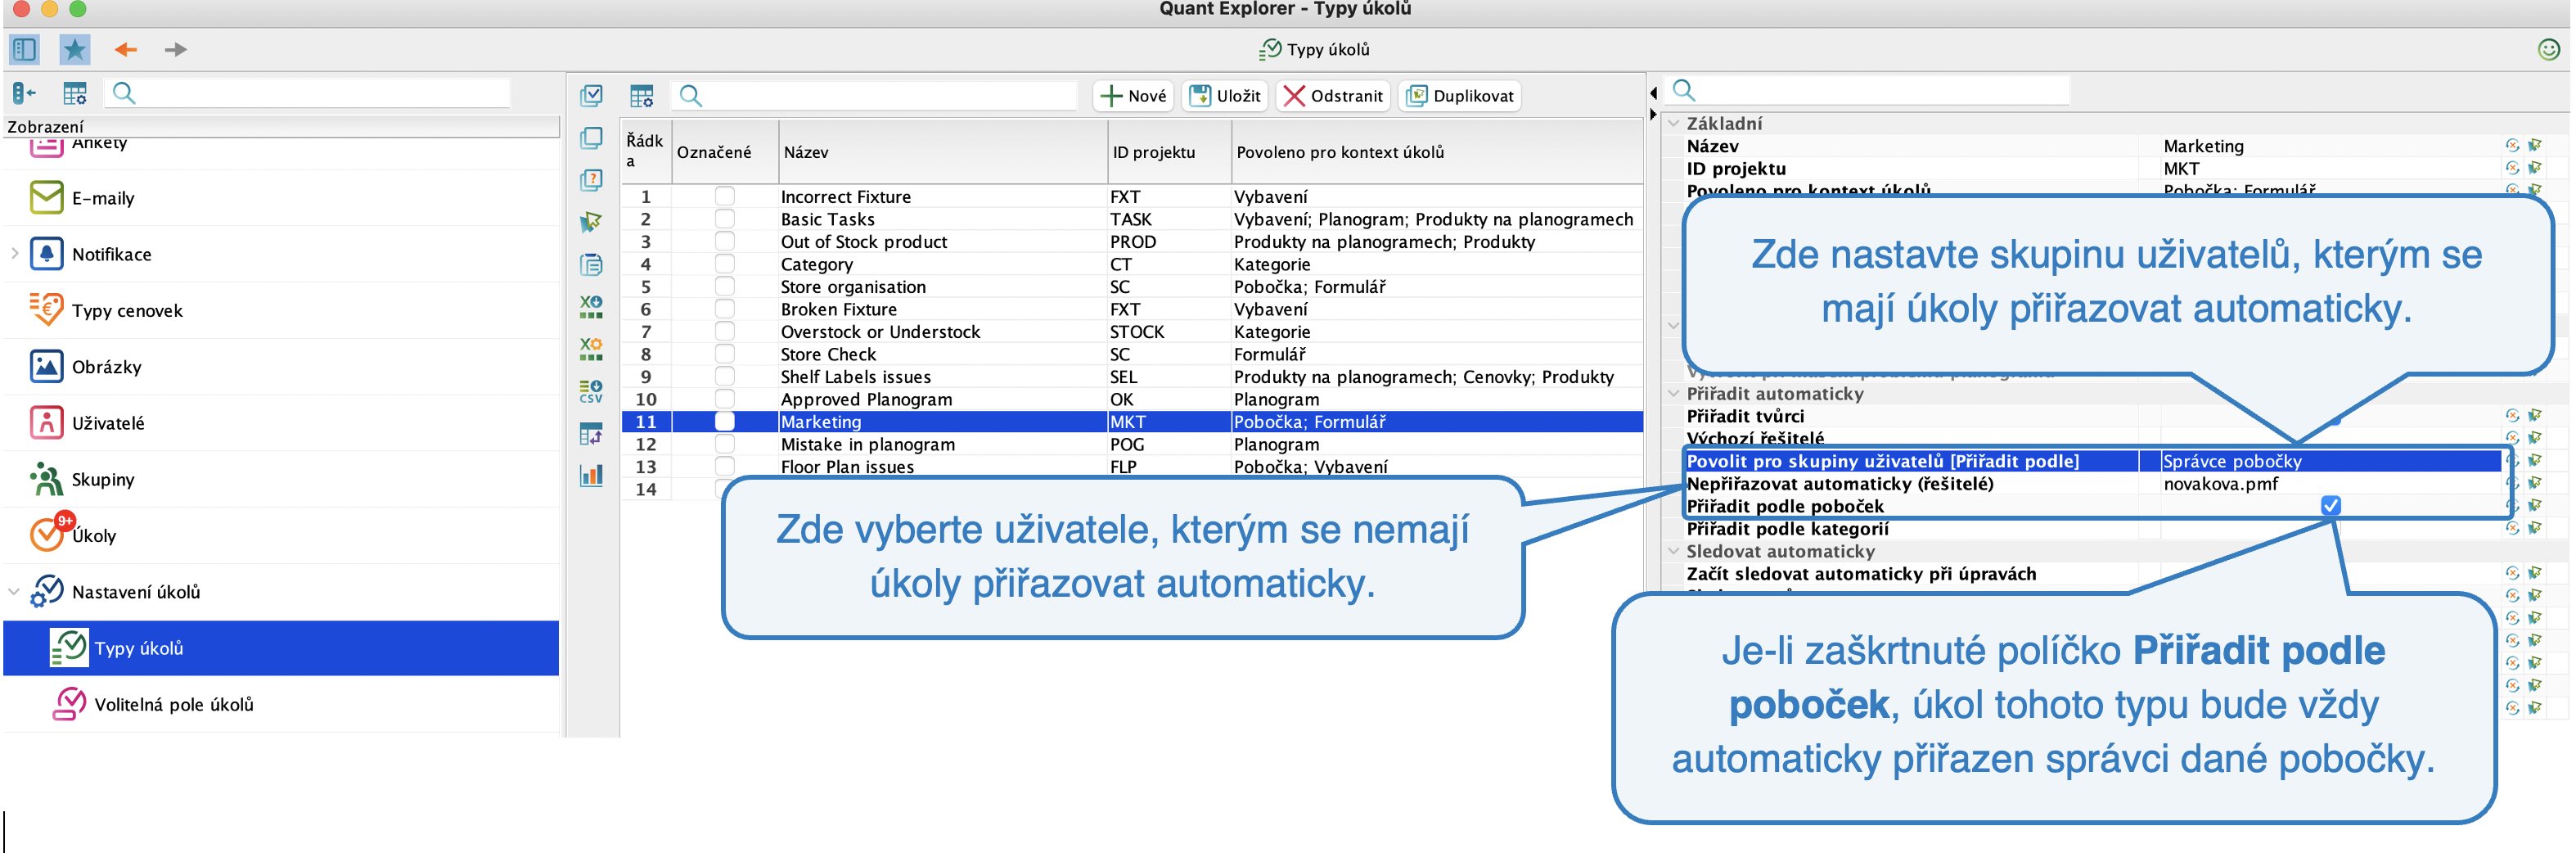
Povolit pro skupiny uživatelů [Přiřadit podle]
Pokud chcete využívat automatické přiřazování úkolů některé skupině uživatelů, musíte tuto skupinu vybrat v tomto řádku.
Nepřiřazovat automaticky (řešitelé)
Pokud chcete některé uživatele vyloučit ze skupiny automatických řešitelů, je potřeba je vybrat v tomto řádku.
Přiřadit podle poboček
Chcete-li, aby se daný typ úkolu přiřazoval automaticky pobočce, pro kterou byl daný úkol vytvořen, zaškrtněte políčko Přiřadit podle poboček. Zároveň však musíte v řádku Povolit pro skupiny uživatelů [Přiřadit podle] zaškrtnout skupinu zahrnující všechny správce poboček.
Typ úkolu Marketing chceme automaticky přiřazovat vždy správci konkrétní prodejny. Tedy kdykoli se vytvoří úkol s typem Marketing, bude automaticky přiřazen správci dané prodejny (kromě uživatele novakova.pmf, který je z automatického přiřazení vyloučen). Můžete díky tomu hromadně vytvořit úkol pro všechny prodejny a zadat jim, aby například vystavily na prodejně nový plakát.
 Přiřadit podle poboček
Přiřadit podle kategorií
Tento atribut můžete využít v případě kontextu Kategorie. Různí uživatelé mohou mít na starosti různá oddělení. V Quantu můžete na konkrétním uživateli nastavit, jaké kategorie spravuje.
Chceme-li, aby se úkol automaticky přiřadil správci kategorií, jež má danou kategorii na starosti, musíme zaškrtnout políčko Přiřadit podle kategorií. Zároveň však musíte v řádku Povolit pro skupiny uživatelů [Přiřadit podle] zaškrtnout skupinu zahrnující všechny správce kategorií.
Správce kategorie Pastry je uživatel novakova.pmf. Budeme-li pro tuto kategorii vytvářet úkol, bude automaticky přiřazen tomuto uživateli.
Sledovat automaticky
V této sekci můžete nastavit, kdo bude automaticky nastaven jako sledující daného typu úkolu. Sledujícímu chodí automaticky notifikace, jsou-li nastavené, takže bude průběžně informován o průběhu řešení.
Začít sledovat automaticky při úpravách
Uživatel, který začne úkol editovat, bude automaticky přiřazen jako sledující daného úkolu.
Sledovat tvůrcem
Uživatel, který úkol vytvoří, bude automaticky přiřazen jako sledující daného úkolu.
Výchozí sledující
K danému typu úkolu lze také nastavit výchozího sledujícího, který je při vytvoření každého úkolu tohoto typu přiřazen jako sledující.
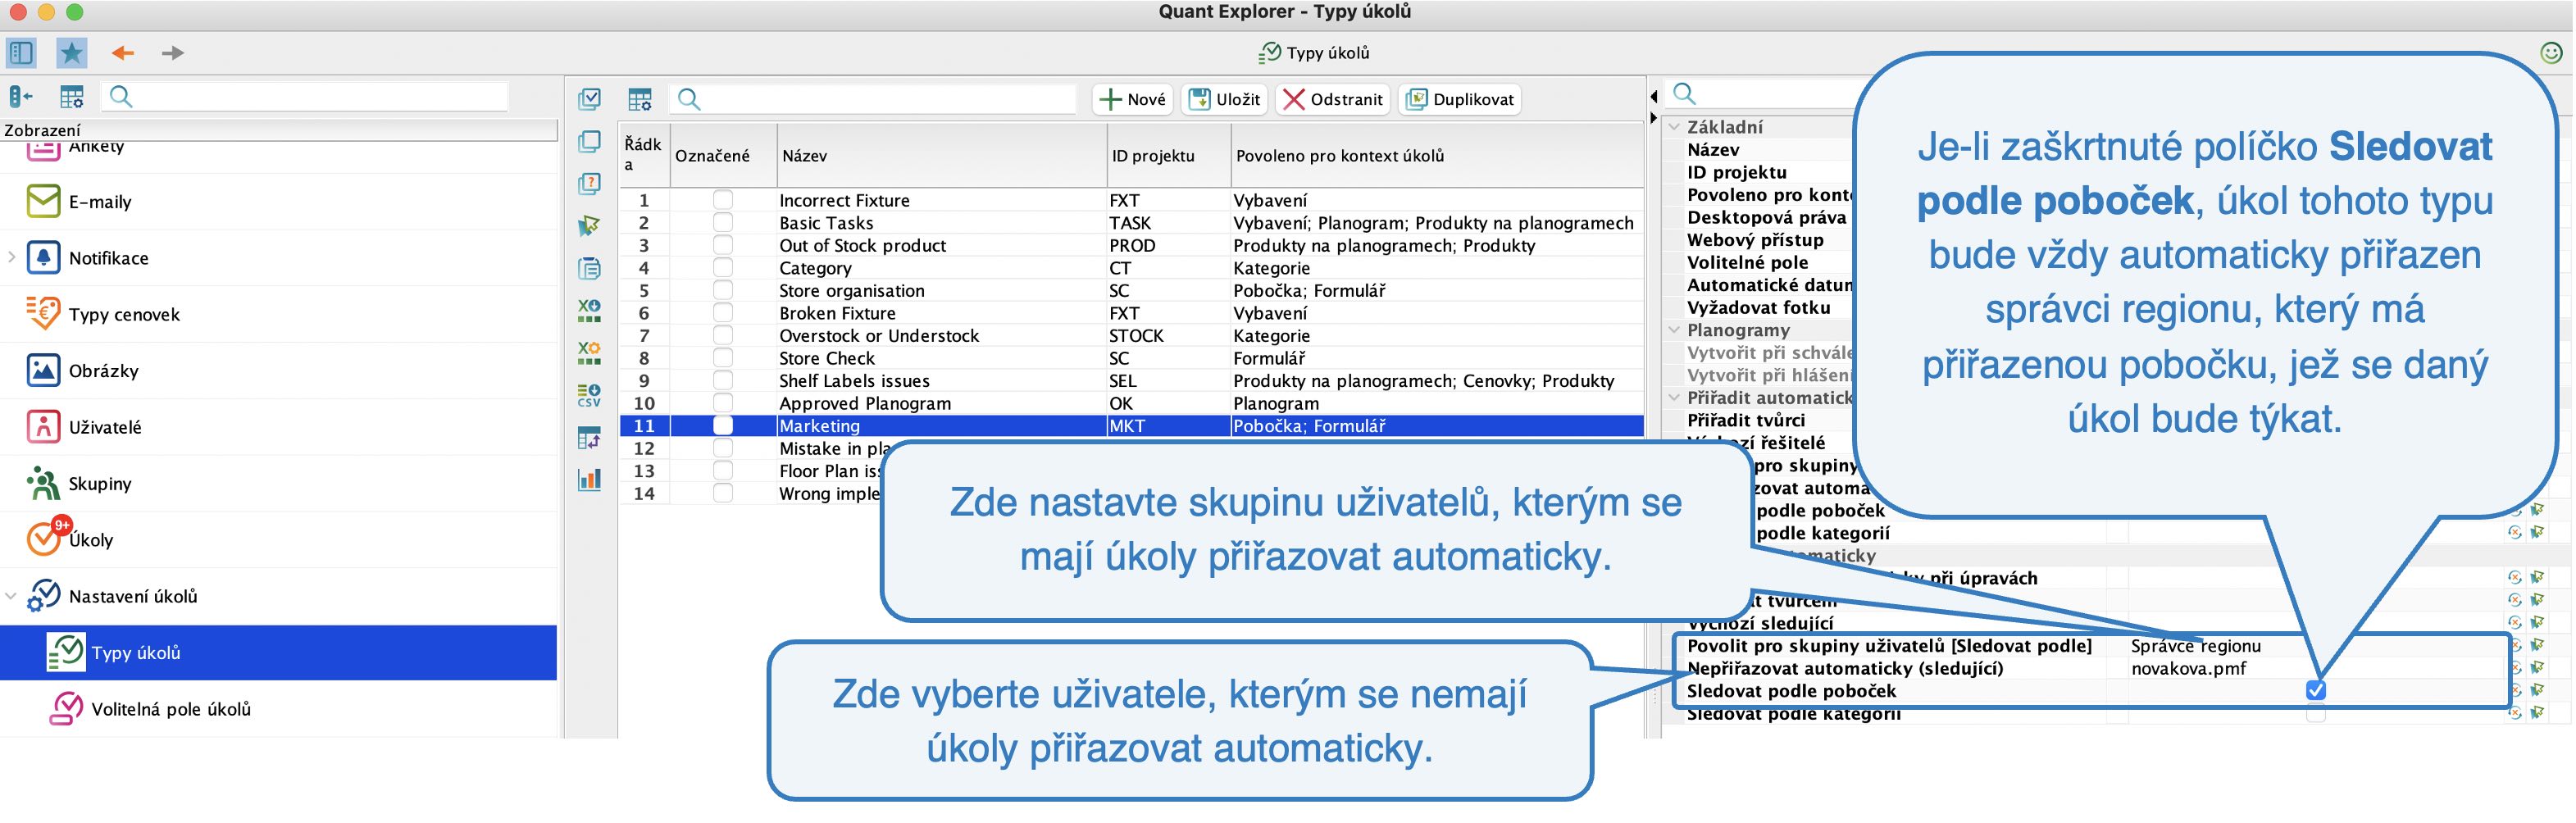
Povolit pro skupiny uživatelů [Sledovat podle]
Podobně jako u automatického nastavení zodpovědných osob, může Quant automaticky přiřazovat i sledující. V tomto řádku musíte nastavit skupinu uživatelů, kteří budou moci daný typ úkolu sledovat.
Nepřiřazovat automaticky (sledující)
V tomto řádku vyberte uživatele, které chcete vyloučit ze skupiny sledujících.
Sledovat podle poboček
Chcete-li, aby se k danému typu úkolu automaticky přiřazoval sledující podle pobočky, pro kterou byl daný úkol vytvořen, zaškrtněte políčko Sledovat podle poboček. Zároveň však musíte v řádku Povolit pro skupiny uživatelů [Sledovat podle] zaškrtnout skupinu zahrnující všechny správce regionů.
 Sledovat podle poboček
Sledovat podle kategorií
Tento atribut můžete využít v případě kontextu Kategorie. Různí uživatelé mohou mít na starosti různá oddělení. V Quantu můžete na konkrétním uživateli nastavit, jaké kategorie spravuje.
Chceme-li, aby se úkol automaticky sledoval správci kategorií, jež má danou kategorii na starosti, musíme zaškrtnout políčko Sledovat podle kategorií. Zároveň však musíte v řádku Povolit pro skupiny uživatelů [Sledovat podle] zaškrtnout skupinu zahrnující všechny správce kategorií.
O e-mailové notifikaci ohledně úkolů si přečtete více v manuálu Notifikace o úkolech.